How to write a Container Storage Interface (CSI) plugin
The goal of this blog post is to show you how to write a CSI plugin using examples and explain the concepts differently.
As some of you know, I'm working for the Containers team at DigitalOcean. We recently announced our new product offering: Kubernetes at DigitalOcean.
We've already been using Kubernetes internally over the last 2.5 years, in almost all our production offerings. When I joined DigitalOcean in late 2015, I was in the team that started our initial PaaS platform on top of Kubernetes. We’re now able to provide our years of experience deploying and maintaining Kubernetes to our customers. This also means a simple and seamless integration with all our product offerings, such as Block Storage.
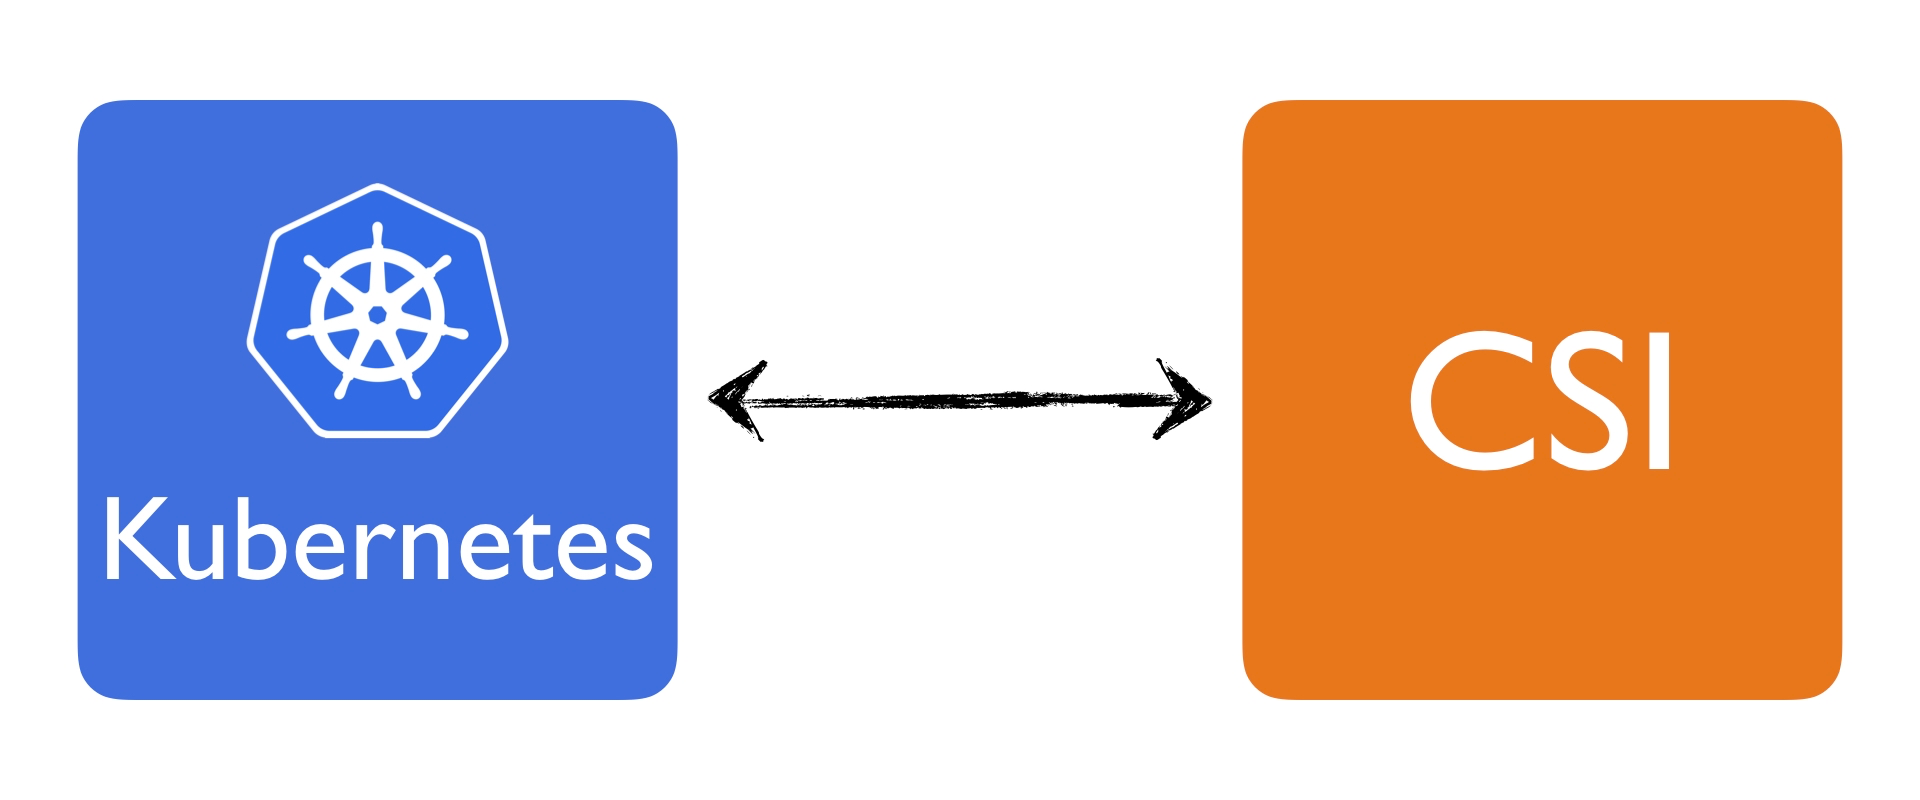
However to integrate these products with Kubernetes, work needs to be done. Luckily, there is an open community to establish a standardized mechanism which aims to integrate storage systems (such as DigitalOcean Block Storage) to containerized workloads. This mechanism is called CSI and Kubernetes is one of the container systems that supports CSI.
CSI comes with a specification. Specifications are good when you want to understand a whole concept exhaustively. However they are hard to understand for newcomers. I'm a person that learns by experimenting and going through examples. The goal of this blog post is to show you how to write a CSI plugin using examples and explain the concepts in a different way. I hope you like it.
Note: At the time of this writing, the spec was at v0.2.0. A new v0.3.0 was released lately, with new additions (such as snapshot API). This blog post won't go over these new additions.
What is CSI?
Before I dive in, let me describe some of the abbreviations (which is also part of the CSI specification, more on this later):
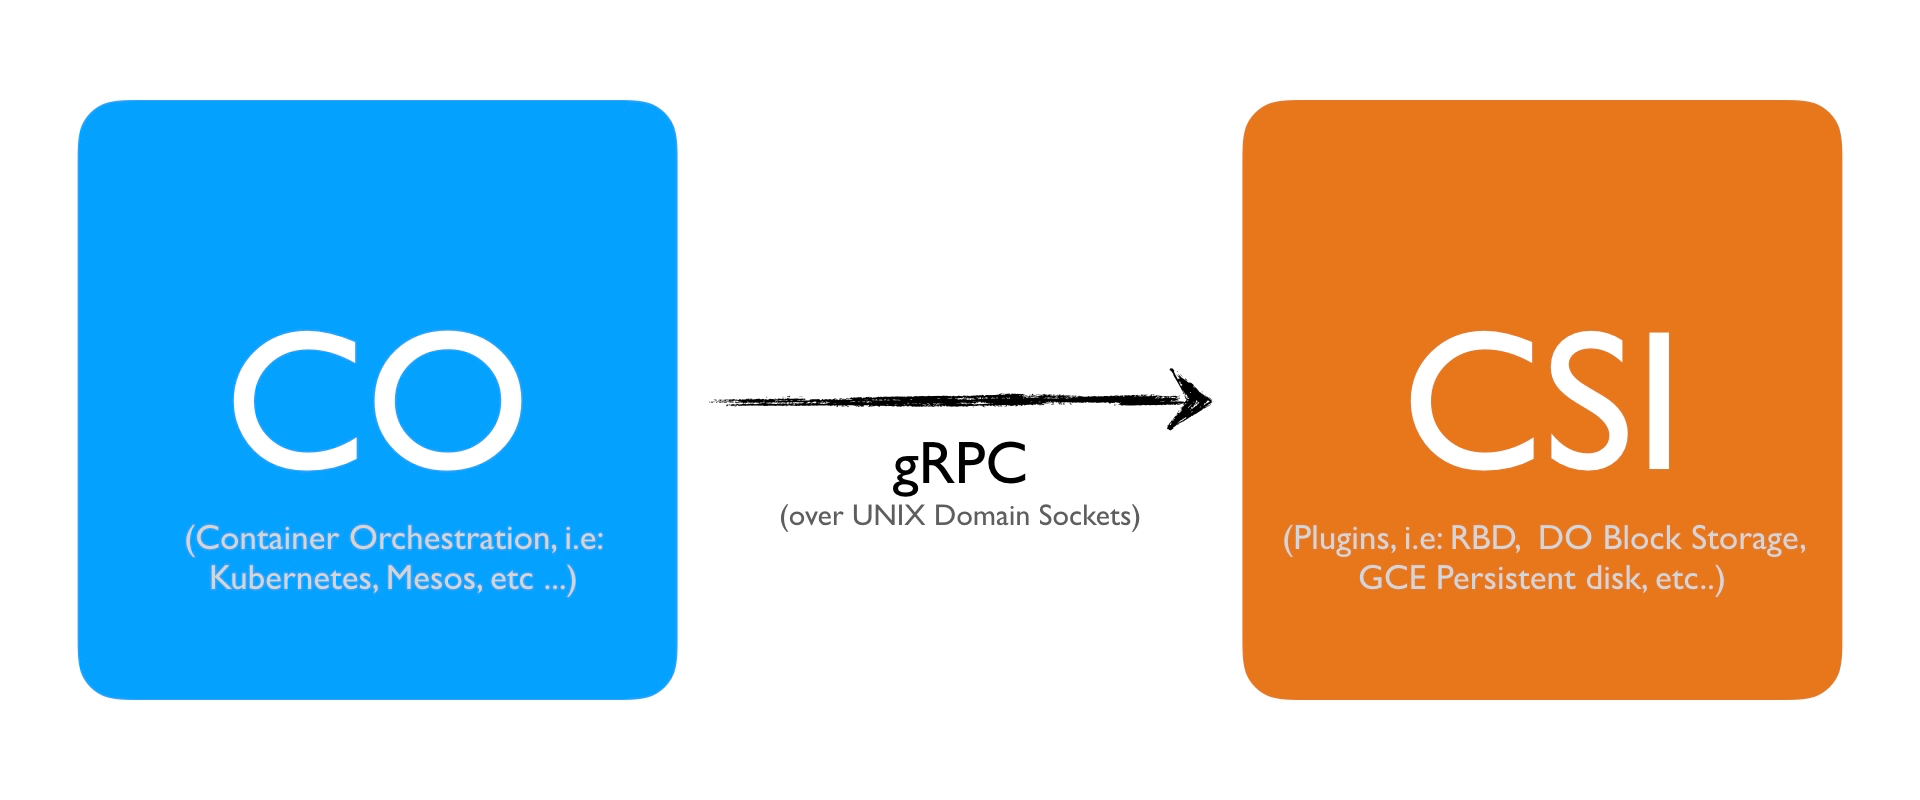
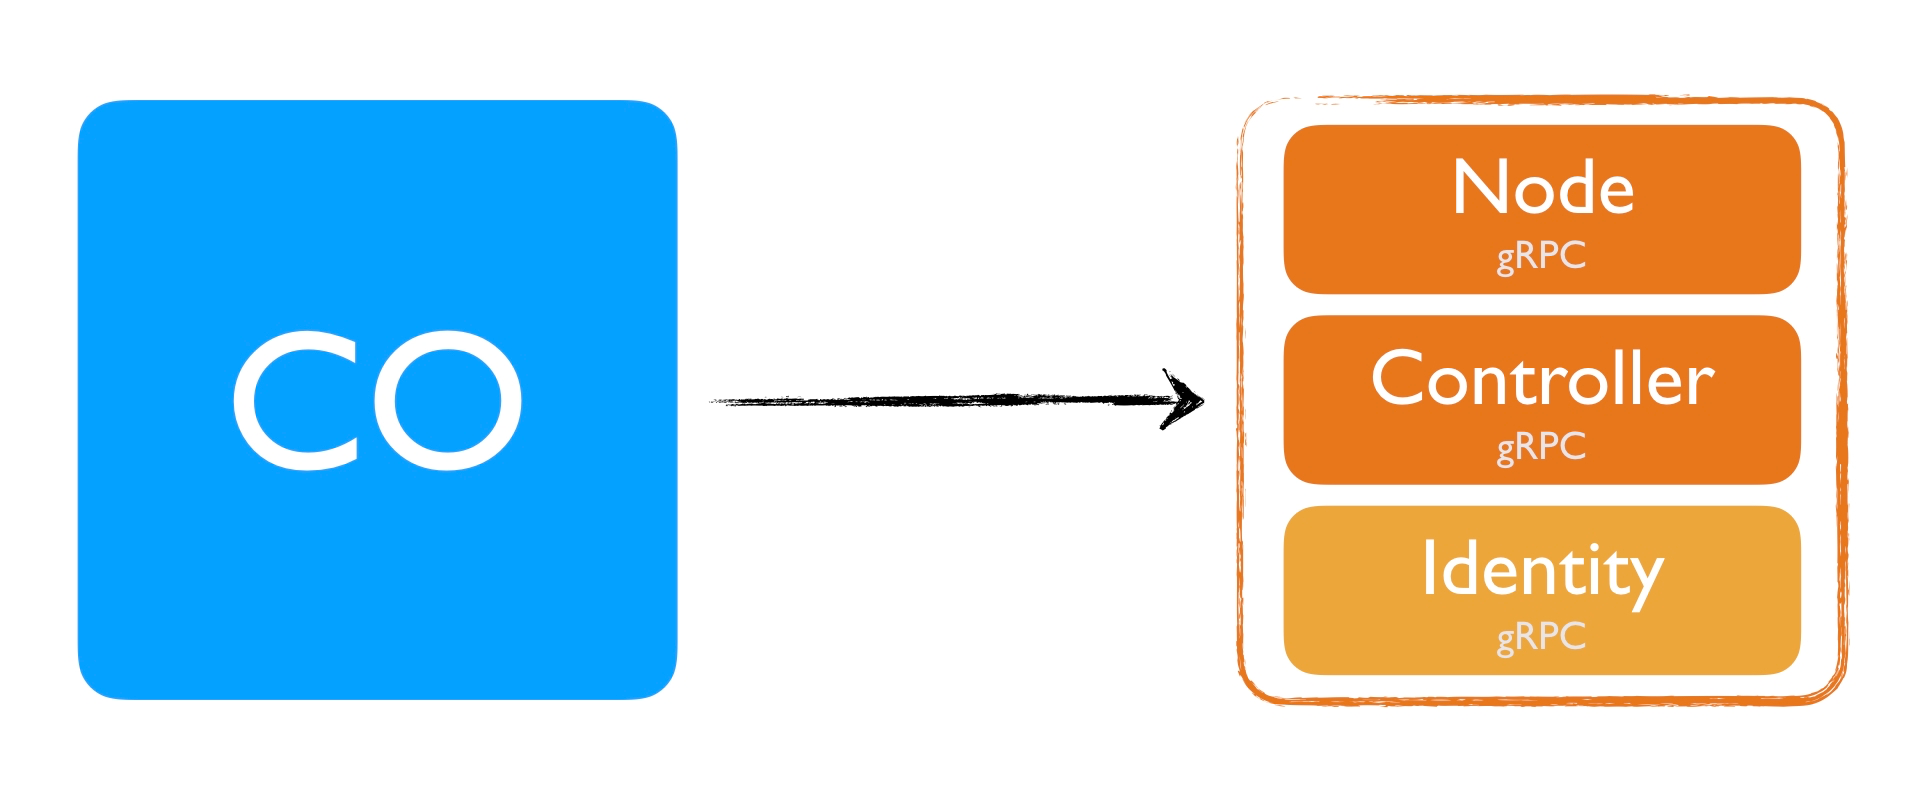
- CO: Container Orchestration system. These are systems such as Kubernetes or Mesos.
- Node: A host where a workload (such as Pods in Kubernetes) will be running.
- Plugin: In the CSI world, this points to a service that exposes gRPC endpoints
So far, you probably have figured out that CSI means Container Storage Interface. This is a standardized mechanism for Container Orchestration Systems to expose arbitrary storage systems to their containerized workloads. There is a CSI specification which explains how the storage interface interaction is handled between various components, such as between Container Orchestration Systems (COs) and Storage Providers.
Various community members from Kubernetes, Mesos, Docker, etc.. worked on this specification together. What this means is that CSI is not a Kubernetes specific technology or specification. A well done CSI implementation should theoretically run in all COs.
Kubernetes v1.9 exposes an alpha implementation of the CSI specification, enabling CSI compatible volume drivers to be deployed on Kubernetes and consumed by Kubernetes workloads. The recommended version is v1.10 as there are little to no additional settings needed to use a CSI plugin.
Overview
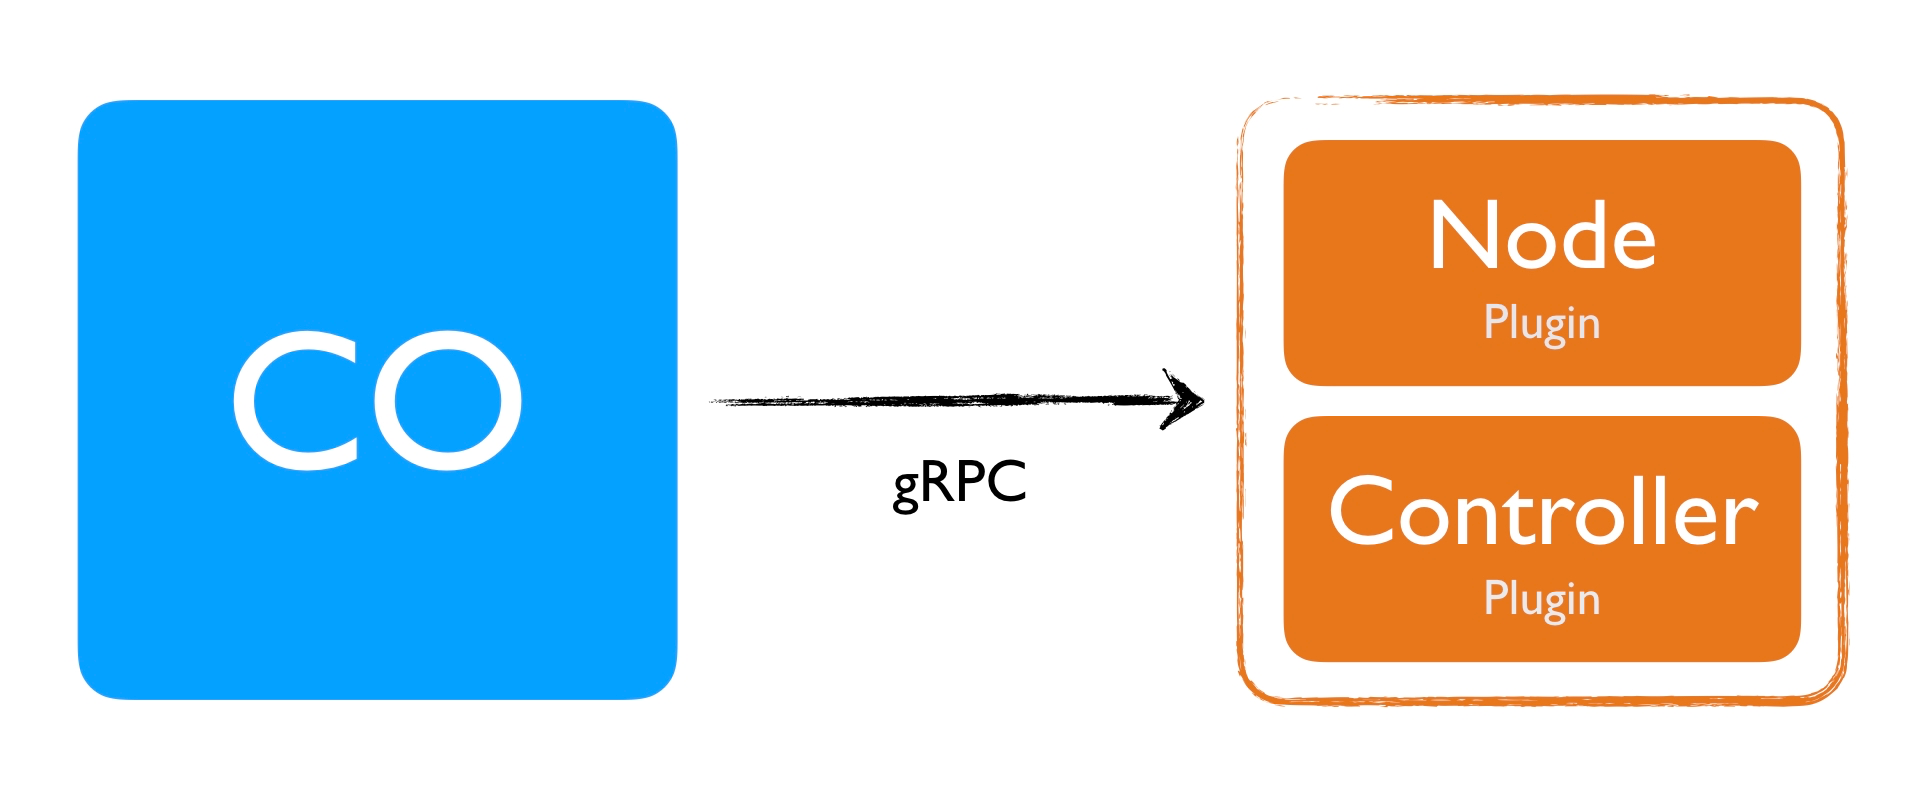
The specification defines the boundary between the CO and the CSI plugin. Before we continue, note that the plugin part actually is separated into two individual plugins.
- Node Plugin
- Controller Plugin
These two entities can live in a single binary or you can separate them. That's up to you. But more on this later.
- The
Nodeplugin is a gRPC server that needs to run on the Node where the volume will be provisioned. So suppose you have a Kubernetes cluster with three nodes where your Pod's are scheduled, you would deploy this to all three nodes. - The
Controllerplugin is a gRPC server that can run anywhere. In terms of a Kubernetes cluster, it can run on any node (even on the master node).
Finally, there is also the Identity gRPC server, which we’ll see in a bit. This service needs to be implemented for each individual plugin. For example, if you have two separate plugins running, Node and Controller, both binaries need to implement the Identity gRPC interface individually.
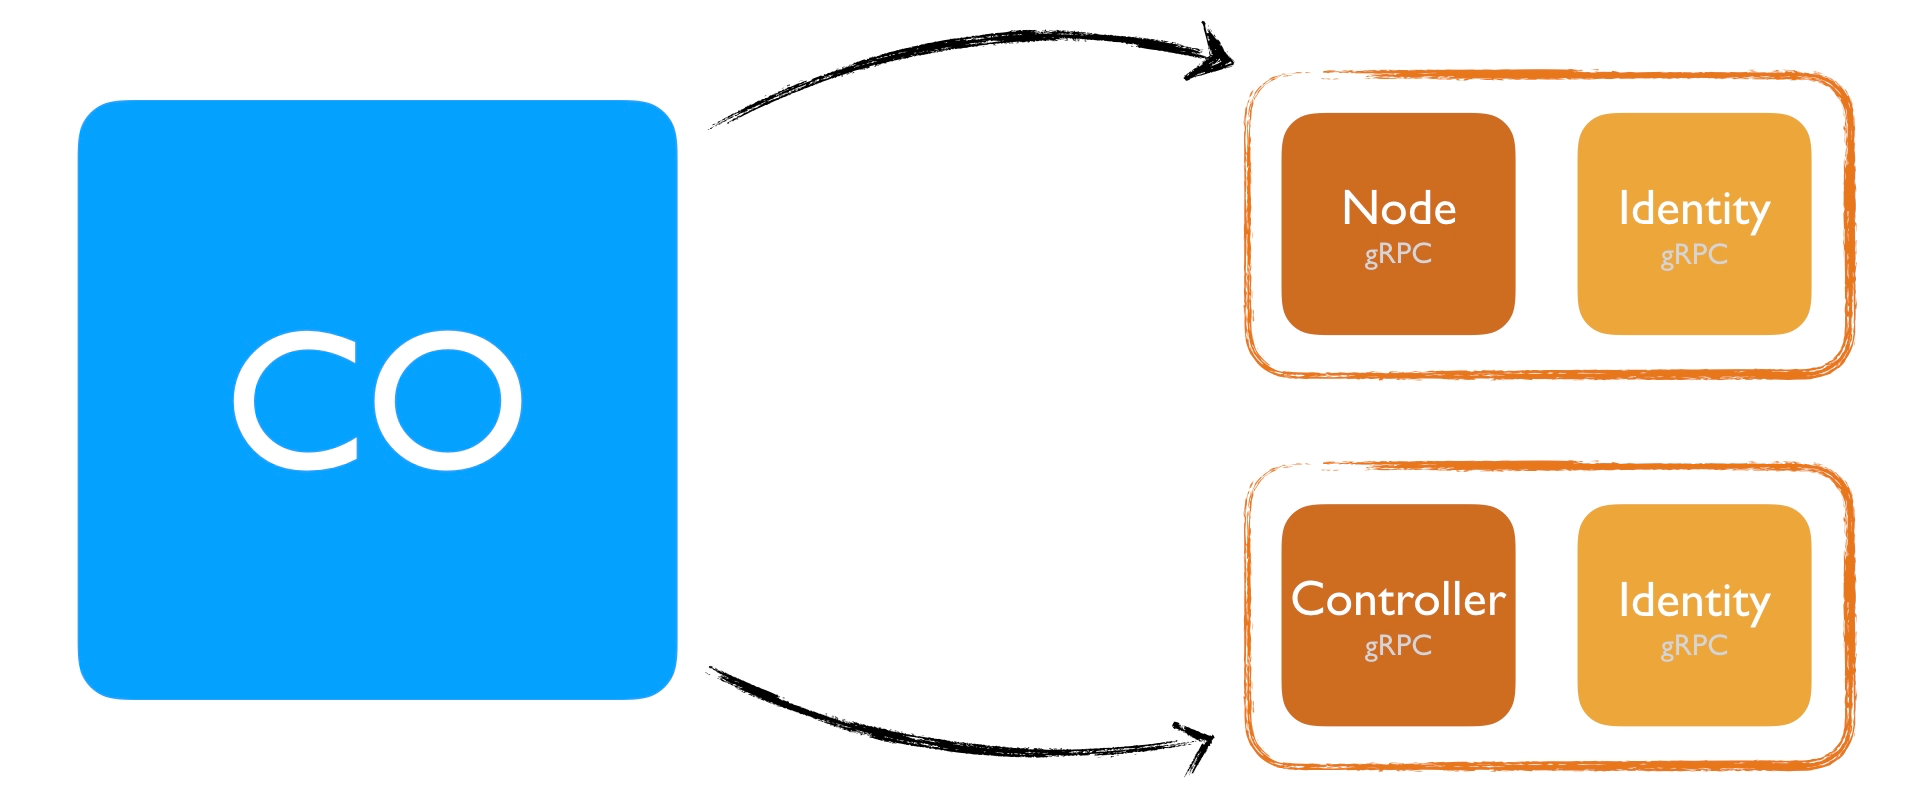
If you however have a single binary that implements Node and Controller, you only need to add the Identity plugin once.
This would mean that a single binary would be a Node and Controller plugin at the same time. Having a single binary, that contains a single gRPC server is much easier to maintain and still has all the benefits of the individual plugins. Depending on where you deploy, it can act as a Node plugin or as a Controller plugin.
Throughout this blog post, this is what we're going to do. Later I'll show how you can split it (if you want).
Interfaces
Let's continue with the interfaces and explain our first interface. The Identity service interface. Remember this has to be implemented by all plugins (Node and Controller):
service Identity {
  rpc GetPluginInfo(GetPluginInfoRequest)
	returns (GetPluginInfoResponse) {}

  rpc GetPluginCapabilities(GetPluginCapabilitiesRequest)
	returns (GetPluginCapabilitiesResponse) {}

  rpc Probe (ProbeRequest)
	returns (ProbeResponse) {}
}
Each of the method does the following:
GetPluginInfo: This method needs to return the version and name of the plugin.GetPluginCapabilities: This method returns the capabilities of the plugin. Currently it reports whether the plugin has the ability of serving theControllerinterface. The CO calls theControllerinterface methods depending on whether this method returns the capability or not.Probe: This is called by the CO just to check whether the plugin is running or not. This method doesn't need to return anything. Currently the spec doesn't dictate what you should return either. Hence, return an empty response.
The Identity service consists of very basic methods and is mainly for identifying the service, making sure it's healthy, and returning basic information about the plugin itself (whether it's a Node plugin or Controller plugin). Here is a basic Go implementation of this service:
// GetPluginInfo returns metadata of the plugin
func (d *Driver) GetPluginInfo(ctx context.Context, req *csi.GetPluginInfoRequest) (*csi.GetPluginInfoResponse, error) {
  return &csi.GetPluginInfoResponse{
    Name:          "com.example.csi.myplugin",
    VendorVersion: "0.1.0",
  }, nil
}

// GetPluginCapabilities returns available capabilities of the plugin
func (d *Driver) GetPluginCapabilities(ctx context.Context, req *csi.GetPluginCapabilitiesRequest) (*csi.GetPluginCapabilitiesResponse, error) {
  return &csi.GetPluginCapabilitiesResponse{
    Capabilities: []*csi.PluginCapability{
      {
      	Type: &csi.PluginCapability_Service_{
      	  Service: &csi.PluginCapability_Service{
      	    Type: csi.PluginCapability_Service_CONTROLLER_SERVICE,
      	  },
      	},
      },
    },
  }, nil
}

// Probe returns the health and readiness of the plugin
func (d *Driver) Probe(ctx context.Context, req *csi.ProbeRequest) (*csi.ProbeResponse, error) {
  return &csi.ProbeResponse{}, nil
}
The above methods implement the following Go interface (csi refers to the following Go package: github.com/container-storage-interface/spec/lib/go/csi/v0):
type IdentityServer interface {
  GetPluginInfo(context.Context, *csi.GetPluginInfoRequest) (*csi.GetPluginInfoResponse, error)
  GetPluginCapabilities(context.Context, *csi.GetPluginCapabilitiesRequest) (*csi.GetPluginCapabilitiesResponse, error)
  Probe(context.Context, *csi.ProbeRequest) (*csi.ProbeResponse, error)
}
One thing to note here is that GetPluginInfo must return the name of the plugin in reverse domain name notation, i.e: io.arslan.csi-blog-post
Next is the Controller service interface. This interface is responsible of controlling and managing the volumes, such as: creating, deleting, attaching/detaching, snapshotting, etc..
If the volumes are part of a Cloud Provider (such as DigitalOcean, GKE, AWS), this interface must be implemented. However if you're planning not to use any kind of block storage or have other ways of providing storage space, you don't have to create this interface. Here is the current definition of the Controller interface:
service Controller {
  rpc CreateVolume (CreateVolumeRequest)
	returns (CreateVolumeResponse) {}

  rpc DeleteVolume (DeleteVolumeRequest)
	returns (DeleteVolumeResponse) {}

  rpc ControllerPublishVolume (ControllerPublishVolumeRequest)
	returns (ControllerPublishVolumeResponse) {}

  rpc ControllerUnpublishVolume (ControllerUnpublishVolumeRequest)
	returns (ControllerUnpublishVolumeResponse) {}

  rpc ValidateVolumeCapabilities (ValidateVolumeCapabilitiesRequest)
	returns (ValidateVolumeCapabilitiesResponse) {}

  rpc ListVolumes (ListVolumesRequest)
	returns (ListVolumesResponse) {}

  rpc GetCapacity (GetCapacityRequest)
	returns (GetCapacityResponse) {}

  rpc ControllerGetCapabilities (ControllerGetCapabilitiesRequest)
	returns (ControllerGetCapabilitiesResponse) {}
}
Let us go quickly over these methods:
CreateVolume: This is the method that provisions a volume. For example this would make an API call to the DigitalOcean Block Storage service and create a volume.DeleteVolume: This deletes a volume that was previously provisioned withCreateVolumeControllerPublishVolume: This method is used make a volume available on some required node. For example, this would make an API call to the DigitalOcean Block Storage service to attach a created volume to a specified node.ControllerUnpublishVolume: This method is the reverse operation ofControllerPublishVolume. That is, to make the volume unavailable on a specified node. For example, this would make an API call for the DigitalOcean Block Storage service to detach a volume from a specific node. Once detached, according to the policy of the CO, the volume can be published to another node.ValidateVolumeCapabilities: This method used to return the capabilities of the volume. The CO calls this to make sure that the volume is provisioned in a way the CO wants. For example, can the volume be mounted on multiple nodes? If yes, can it be used for read/write simultaneously from multiple nodes, or only one a single node? For example, a DigitalOcean Block Storage can be only attached to a single node in read/write mode.ListVolumes: This method should return all available volumes. What’s neat is that it has support for paginating, so that you can return large set of volumes easily (assuming the underlying Cloud Provider API supports paginating)GetCapacity: This returns the capacity of the total available storage pool. This is needed in case you have a limited storage capacity. Suppose you know that you can only provide 1TB of storage. When you provision and create new volumes, you should reflect it and return the remaining available storage.ControllerGetCapabilities: this returns the capabilities of the Controller plugin. Some controller plugins might not implementGetCapacity(for example cloud providers, because it's hidden from the user), some might not provideSnapshotting. The method needs to return a list of capabilities it supports.
To implement the Controller service, you need to implement the following Go interface:
type ControllerServer interface {
  CreateVolume(context.Context, *csi.CreateVolumeRequest) (*csi.CreateVolumeResponse, error)
  DeleteVolume(context.Context, *csi.DeleteVolumeRequest) (*csi.DeleteVolumeResponse, error)
  ControllerPublishVolume(context.Context, *csi.ControllerPublishVolumeRequest) (*csi.ControllerPublishVolumeResponse, error)
  ControllerUnpublishVolume(context.Context, *csi.ControllerUnpublishVolumeRequest) (*csi.ControllerUnpublishVolumeResponse, error)
  ValidateVolumeCapabilities(context.Context, *csi.ValidateVolumeCapabilitiesRequest) (*csi.ValidateVolumeCapabilitiesResponse, error)
  ListVolumes(context.Context, *csi.ListVolumesRequest) (*csi.ListVolumesResponse, error)
  GetCapacity(context.Context, *csi.GetCapacityRequest) (*csi.GetCapacityResponse, error)
  ControllerGetCapabilities(context.Context, *csi.ControllerGetCapabilitiesRequest) (*csi.ControllerGetCapabilitiesResponse, error)
}
And here is an example Go implementation (linking to it as it's very long): controller.go.
I'll share some common important tips & tricks at the end of this section.
Let's move on until then :)
Finally, we have the Node service interface:
service Node {
  rpc NodeStageVolume (NodeStageVolumeRequest)
	returns (NodeStageVolumeResponse) {}

  rpc NodeUnstageVolume (NodeUnstageVolumeRequest)
	returns (NodeUnstageVolumeResponse) {}

  rpc NodePublishVolume (NodePublishVolumeRequest)
	returns (NodePublishVolumeResponse) {}

  rpc NodeUnpublishVolume (NodeUnpublishVolumeRequest)
	returns (NodeUnpublishVolumeResponse) {}

  rpc NodeGetId (NodeGetIdRequest)
	returns (NodeGetIdResponse) {}

  rpc NodeGetCapabilities (NodeGetCapabilitiesRequest)
	returns (NodeGetCapabilitiesResponse) {}
}
Let's go over these methods, as they need some explanation:
NodeStageVolume: This method is called by the CO to temporarily mount the volume to a staging path. Usually this staging path is aglobal directoryon the node. In Kubernetes, after it's mounted to theglobal directory, you mount it into thepod directory(viaNodePublishVolume). The reason that mounting is a two step operation is because Kubernetes allows you to use a single volume by multiple pods. This is allowed when the storage system supports it (say NFS) or if all pods run on the same node. One thing to note is that you also need to format the volume if it's not formatted already. Keep that in mind.NodeUnstageVolume: This method is called by the CO tounmountthe volume from the staging path. It's the reverse ofNodeStageVolumeNodePublishVolume: This method is called to mount the volume from staging to target path. Usually what you do here is a bind mount. A bind mount allows you to mount a path to a different path (instead of mounting a device to a path). In Kubernetes, this allows us for example to use the mounted volume from the staging path (i.eglobal directory) to the target path (pod directory). Here, formatting is not needed because we already did it inNodeStageVolume.NodeUnpublishVolume: This is the reverse ofNodePublishVolume. It unmounts the volume from the target path.NodeGetId: This method should return a unique ID of the node on which this plugin is running. For example, for DigitalOcean we return the Droplet ID.NodeGetCapabilities: Just likeControllerGetCapabilities, this returns the capabilities of theNodeplugin. For example if you don't advertiseRPC_STAGE_UNSTAGE_VOLUMEcapability, the CO will not callNodeStageVolumeandNodeUnstageVolumeas you don't provide it.
To implement the Node service, you need to implement the following Go interface:
type NodeServer interface {
  NodeStageVolume(context.Context, *NodeStageVolumeRequest) (*NodeStageVolumeResponse, error)
  NodeUnstageVolume(context.Context, *NodeUnstageVolumeRequest) (*NodeUnstageVolumeResponse, error)
  NodePublishVolume(context.Context, *NodePublishVolumeRequest) (*NodePublishVolumeResponse, error)
  NodeUnpublishVolume(context.Context, *NodeUnpublishVolumeRequest) (*NodeUnpublishVolumeResponse, error)
  NodeGetId(context.Context, *NodeGetIdRequest) (*NodeGetIdResponse, error)
  NodeGetCapabilities(context.Context, *NodeGetCapabilitiesRequest) (*NodeGetCapabilitiesResponse, error)
}
And here is a corresponding example implemented in Go: node.go
Implementation tips and tricks
Let me touch couple of things that are important for all interfaces:
- All functions have to be idempotent. This means that whatever requests comes in, the process handling should always be the same. Suppose you got a
CreateVolumerequest and you create a volume. If you get anotherCreateVolumerequest with the same name, you should not create the volume, instead you should return the same response, as it was already created. To achieve this, you have to check for an existing volume first, and create a volume only if it doesn't exist. This is a very essential part of a good and stable, distributed API (tip: I recommend to read this blog post from Stripe: https://stripe.com/blog/idempotency) - Be aware of the internal API you're using inside the Plugin. Creating or attaching a volume is not an instant action. It might take several seconds to minutes. That's why having a function such as
waitForCreationorwaitForAttachthat waits until the action is finished is essential. For example, suppose you attach a volume by making a call to DigitalOcean Block Storage API, you need to make sure to make additional API requests until the attach action is completed. - Have a proper logging system inside the driver. This makes it very easy to debug and observe how your driver works. I prefer using a K/V logger, such a logrus. Pairing it with a tool like humanlog will give you flexibility and easy to read logs.
- One problem with logging is that people log the error when they return, i.e:
vol, _, err := d.doClient.Storage.CreateVolume(ctx, volumeReq)
if err != nil {
	log.Err(err).Error("creating volume failed")
	return nil, status.Error(codes.Internal, err.Error())
}
The reason for that is to capture the error, because there is no way to understand what the error content was once you returned the error. The error will propagate and might end up somewhere else in the CO system (such as events in Kubernetes, which you will usually see if you do kubectl describe pods/pod-with-pvc ). Another disadvantage is that you need to write the error twice in every single return.
A better way is to log the errors via a gRPC interceptor. An interceptor is like a Go http/handler middleware. In gRPC, you can create the following errInterceptor, which will call your method and then log the error:
errInterceptor := func(ctx context.Context, req interface{}, info *grpc.UnaryServerInfo, handler grpc.UnaryHandler) (interface{}, error) {
	resp, err := handler(ctx, req)
	if err != nil {
		log.WithError(err).WithField("method", info.FullMethod).Error("method failed")
	}
	return resp, err
}

srv = grpc.NewServer(grpc.UnaryInterceptor(errInterceptor))
srv.Serve()
// ...
Now, with this interceptor added, every time you return an error, it'll be logged and you don't have to write a log statement in each return anymore.
- There is an excellent test framework that test your driver: csi-test. With this package you can directly run unit tests against your CSI API. To run the test, create a
foo_test.gofile, run your driver and then run the sanity test. Below is an example code layout that uses this test package:
import "github.com/kubernetes-csi/csi-test/pkg/sanity"

func TestMyDriver(t *testing.T) {
	// Setup the driver and its environment
	endpoint := "unix:///tmp/csi.sock"

	// assuming your driver is encapsulated in a struct like this
	// also, your driver needs to be testable. So if it's calling a cloud
	// provider, you need to replace it with a fake API client. Applies to
	// everything that touches something outside ...
	driver := &Driver{
		endpoint: endpoint,

	}
	defer driver.Stop()

	// run your driver
	go driver.Run()

	mntDir, err := ioutil.TempDir("", "mnt")
	if err != nil {
		t.Fatal(err)
	}
	defer os.RemoveAll(mntDir)

	mntStageDir, err := ioutil.TempDir("", "mnt-stage")
	if err != nil {
		t.Fatal(err)
	}
	defer os.RemoveAll(mntStageDir)

	cfg := &sanity.Config{
		StagingPath: mntStageDir,
		TargetPath:  mntDir,
		Address:     endpoint,
	}

	// Now call the test suite
	sanity.Test(t, cfg)
}
A simple go test will run the test with all the individual cases:
$ go test
Running Suite: CSI Driver Test Suite
====================================
Random Seed: 1528418150
Will run 31 of 31 specs

Ran 30 of 31 Specs in 0.020 seconds
SUCCESS! -- 30 Passed | 0 Failed | 0 Pending | 1 Skipped --- PASS: TestDriverSuite (0.02s)
PASS
ok      github.com/digitalocean/csi-digitalocean/driver 0.039s
Checkout how the csi-test package is used within the csi-digitalocean driver: csi-digitalocean/driver_test.go. Note that this is not a end to end test. You should probably write integrations tests for your own driver.
Kubernetes Deployment
So far, I have only explained some of the concepts and how they would apply to Kubernetes. However, once you write a CSI driver, theoretically if the CO adheres to the specification, it should work exactly the same everywhere. That's why there is no single word of Kubernetes related concepts in the CSI driver. For example you don't have the ability to use any kind of Kubernetes resources via the K8s API, such as Pod, StatefulSet, Persistent Volumes, Persistent Volume Claim labels or annotations (in case you want to use them inside the driver). Those are unknown to the driver. (hint: there is some work being done to allow passing metadata down to drivers, but this work has not been formalized yet)
Nevertheless. there are a few things you need to know if you want to deploy a CSI driver to be used with Kubernetes.
First of all, there is already lengthy documentation on how you should deploy your CSI driver to Kubernetes. This is the recommended way of deploying the driver. There are many details here, but the most important piece is how the Controller and Node plugins are meant to work. Let us rephrase it again:
- The
Node pluginis a gRPC server that needs to run on the Node where the volume will be provisioned to. So suppose you have a Kubernetes cluster with three nodes where your Pods are scheduled, you would deploy this to all three nodes. The reason it needs to be on all nodes is because it needs to be able toformatandmountthe volume that is attached to a given volume. If you want to a single Node to be used for volumes, you need to make sure only that node is running theNode plugin. - The
Controller pluginis a gRPC server that can run anywhere, but needs to run as single copy. In terms of a Kubernetes cluster, it can run on any node (even on the master node). But only one copy of the controller should run. This is because theControlleris creating/deleting and attaching/detaching volumes. If you somehow run more than one copy or put a loadbalancer in front of it, it could be that that two controller services try to create the same volume or they might both try to attach this volume at the same time. This needs to be avoided.
To deploy these plugins there are several options. Either you install them directly, via systemd, upstart, etc.. or you deploy them as Kubernetes primitives. If you're already running a Kubernetes cluster, its best to deploy them as Kubernetes primitives (why not? :).
Suppose we want to deploy them as Kubernetes primitives, how would we achieve this? Since we know how the Node and Controller plugins work and interact with the systems, we can start designing this deployment.
- We could deploy the
Node pluginas multiplePodsby using a nodeSelector, choosing a different node for each Pod. TheController plugincould be deployed as a singlePodand placed by the scheduler to a random node. But this all is old school, pods are ephemeral and a very bad idea. - We could deploy the
Node pluginviaDeploymentand set the scale to the number of nodes. But this wouldn't work because they might end up deployed to the same node. For theController pluginwe could set the scale to1. But this would also not work, because during a rolling update, there might be the possibility that two pods are running at the same time. - What we could do is to deploy the
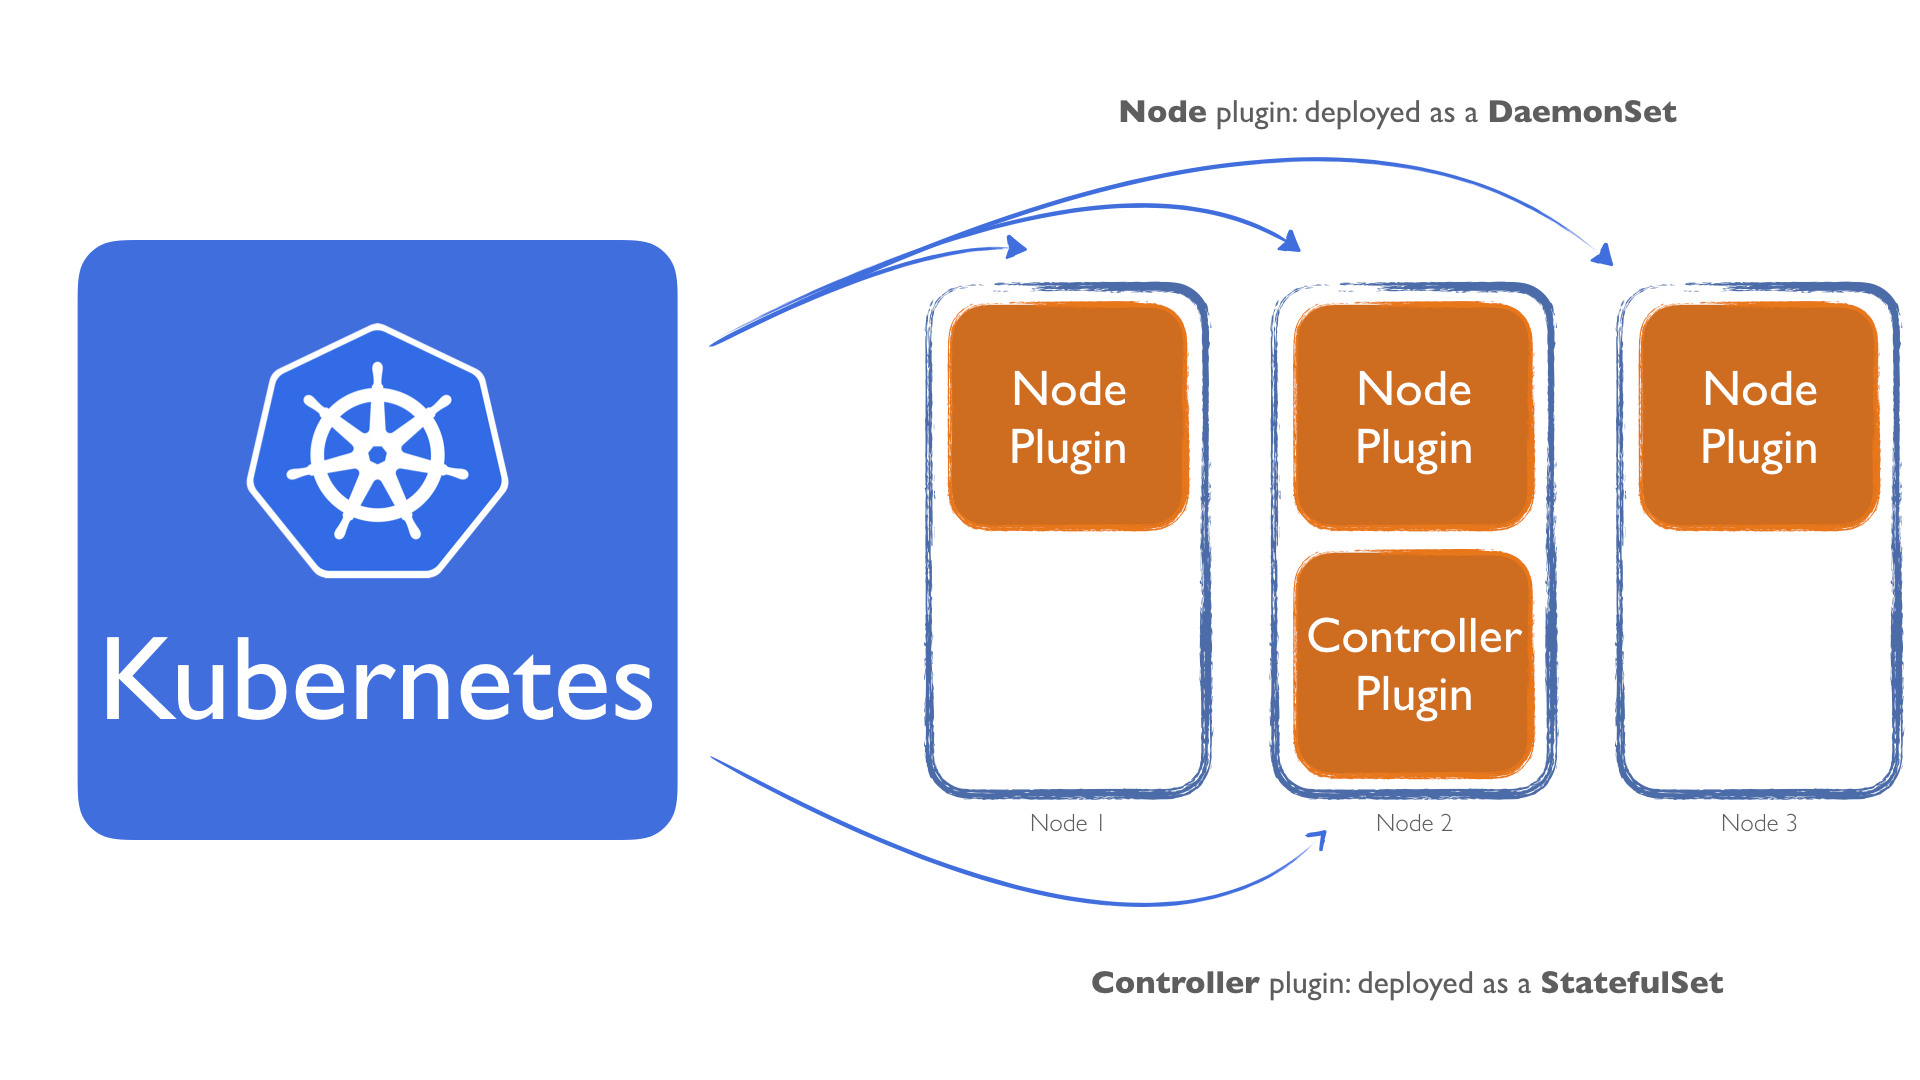
Nodeplugin as a Daemonset. This ensures that a copy of a Pod (our plugin) runs on all nodes. This would satisfy the requirement for theNode plugin. For theController plugin, we could deploy it as aStatefulSet. Most people associateStatefulSetwith a persistent storage. But it's more powerful. AStatefulSetalso comes with scaling guarantees. This means we could use theController pluginas aStatefulSetand set the replicas field to1. This would give us a stable scaling, that means that if the pod dies or we do an update, it never creates a second pod before the first one is fully shutdown and terminated. This is very important, because this guarantees that only a single copy of theController pluginwill run.
So, to recap:
- The
Nodeplugin will be deployed as a DaemonSet - The
Controllerplugin will be deployed as a StatefulSet
Now, how would we deploy the plugins? In the beginning of this blog post, I mentioned that the interfaces could be separated into individual services (binaries) or unified into a single binary. Our options are:
- Create one, unified binary. A single binary that exposes all methods that satisfies a
NodeandControllerplugin. - Create two binaries. One binary that satisfies the
Nodeplugin and another one that satisfiesControllerplugin driver. - Create a single binary that only satisfies
Nodeplugin. A Node-only Plugin component supplies only the Node Service. ItsGetPluginCapabilitiesRPC does not report theCONTROLLER_SERVICEcapability.
For a cloud provider, both the Node and Controller needs to be implemented. So option three is out of question. The question boils down to whether you want to have separate binaries or just a single binary. For the DigitalOcean CSI driver we opted to have a single binary. This makes it very easy to maintain and also to deploy (you specify the same docker image for both DaemonSet and StatefulSet).
If we would opt-in to have two different services (Node plugin and Controller plugin separated), it would create additional maintenance burden. This would mean we had to maintain two separate binaries, two different docker image, etc..
A single binary has the benefit that it doesn't matter how you deploy things. Inside a Go main function, all you do is to register all your implementations within a single gRPC server:
// returns a struct instance that satisfies Node, Controller and
// Identity interfaces
d := NewDriver()

srv = grpc.NewServer(grpc.UnaryInterceptor(errInterceptory))
csi.RegisterIdentityServer(srv, d)
csi.RegisterControllerServer(srv, d)
csi.RegisterNodeServer(srv, d)

listener, err := net.Listen("unix://", "/var/lib/kubelet/plugins/com.digitalocean.csi.dobs/csi.sock")
if err != nil {
	return fmt.Errorf("failed to listen: %v", err)
}

return srv.Serve(listener)
Once you have these and deploy them via unified binary, the CO will make sure to call the correct gRPC method. For example it'll call NodePublishVolumeto a Node plugin if the times come, or it might call GetPluginCapabilities(via the Identifiy interface) and decide if the plugin supports the Controller interface, if yes it could call the CreateVolume method.
However, how does the CO (in our case Kubernetes) know which Pod is Node or Controller?
You might think that GetPluginCapabilities is a way of doing it. But this only indicates whether the plugin has Controller capabilities, it doesn't signal whether it's a Node or Controller plugin. It could be be both (which it is in our case because we use a single binary).
To solve this, Kubernetes has the following sidecar containers that does this for us:
- driver-registrar: Sidecar container that 1) registers the CSI driver with kubelet, and 2) adds the drivers custom NodeId to a label on the Kubernetes Node API Object.
- external-provisioner: Sidecar container that watches Kubernetes PersistentVolumeClaim objects and triggers CreateVolume/DeleteVolume against a CSI endpoint.
- external-attacher: Sidecar container that watches Kubernetes VolumeAttachment objects and triggers
ControllerPublish/Unpublishagainst a CSI endpoint
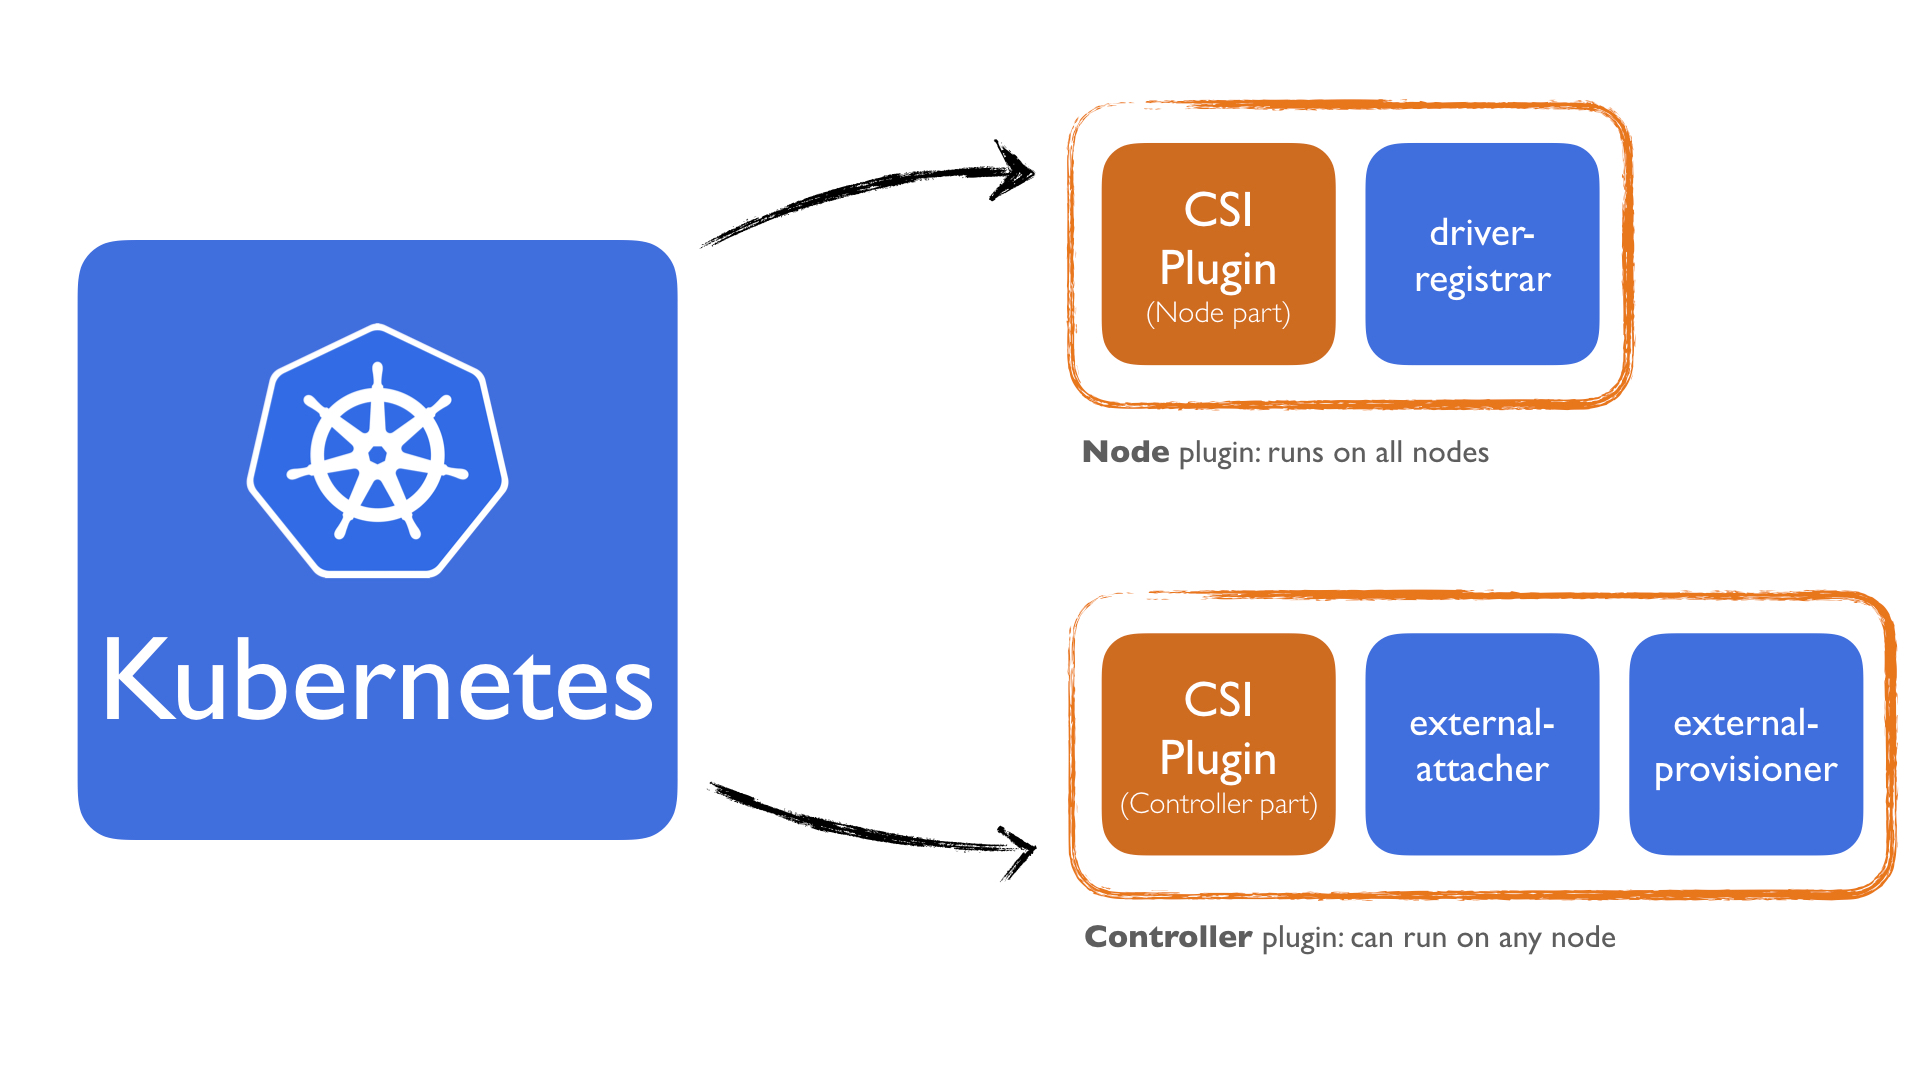
What we do from here is, We deploy the Node plugin with the driver-registrar. This sidecar only registers the plugin. It doesn't make any calls to the Node plugin interface methods. All calls to Node plugin are made via kubelet itself. For more details how this is done, checkout this section on the Kubelet to CSI Driver Communication protocol.
The Controller plugin will be deployed with the external-provisioner and external-attacher sidecars. This is more straightforward because the external-provisioner is responsible for creating/deleting the volumes and the external-attacher is responsible for attaching/detaching the volume. Both these are calling the appropriate CSI gRPC methods of the Controller plugin. They don't know anything about which cloud provider is going to be used at all.
For an example Kubernetes YAML file that has all these concepts in a ready to be deployed form can be seen here: https://github.com/digitalocean/csi-digitalocean/blob/master/deploy/kubernetes/releases/csi-digitalocean-v0.1.1.yaml
Once you create a API Secret token:
apiVersion: v1
blogkind: Secret
metadata:
  name: digitalocean
  namespace: kube-system
stringData:
  access-token: "a05dd2f26b9b9ac2asdas__REPLACE_ME____123cb5d1ec17513e06da"
all you do is to install the plugin to you cluster via:
kubectl apply -f https://raw.githubusercontent.com/digitalocean/csi-digitalocean/master/deploy/kubernetes/releases/csi-digitalocean-v0.1.0.yaml
This will successfully install the csi-digitalocean plugin to your system. Remember, now that you have read this blog post, you know that the plugin is a system of separate components and plugins. You should be able to debug it and understand why we deploy the Node as a Daemonset and the Controller as a StatefulSet
Recap
To recap what we have done so far:
- We explained the concepts of the
Node, Controller and IdentitygRPC interfaces and how they map to a plugin. - We went over the various interfaces and looked into each method individually. We showed how to write them in Go and learned that most of the methods have to be
idempotentto work in a distributed system such as this one. - While writing for a cloud provider, we should be aware that some actions might be not instantaneous and we have to periodically check the status of it until said action has completed (or failed!).
- We looked into how to deploy a CSI driver to a Kubernetes cluster. We went over various Kubernetes resources and explained why a
DaemonSetandStatefulSetis the recommended way to deploy theNodeandControllerplugin. - We showed how to group the interfaces into individual services and decided to use a single, unified binary. This allows us to deal with a single binary and docker image, and therefore makes it easier to maintain.
- Finally we showed how to close the bridge between Kubernetes and the CSI driver via several different sidecars, such as
external-attacher,external-provisioneranddriver-registrar. These sidecars are bundled with unified binary we created and act asNodeorControllerplugin depending on which sidecar was included into the pod.
All these concepts are written in a very detailed way in the CSI specification and in the Kubernetes-CSI relationship proposal. I highly recommend to read and go over them. You should now find these documents much easier to digest, and understand how they come together.
As a final word, the CSI specification is fairly new. It's an ongoing work and there are still things that need to be fleshed out. It makes things much easier compared to the old ways of provisioning volumes to Kubernetes itself. Because the drivers all live outside the Kubernetes repo, the Storage vendors have much more flexibility and power. Previously things could be only released with each Kubernetes version. With the CSI specification, drivers can be released at anytime and can be updated very easily.
For example, as of now, the CSI Spec was updated to have Snapshots as a feature. This was not part of my blog post, but you can see how the specification can advance independently on its own without relying on any CO's release schedule, such as Kubernetes.
Thanks for reading it all the way down here. If you made it here, let me know about your thoughts and feedbacks!